We are introducing Fruit Cream Anmitsu a refreshing dessert that is also low in calories. It’s getting warmer this time of year and now is the perfect time to enjoy the cold dessert!
")
| Cook Time | 25 minutes |
| Chilling kanten and kuromitsu syrup is not included in cook time. |
| Servings |
people
|
| Translator | Get Francis Mug |
|
|

Ingredients
Kanten
4 g Kanten Powder (Agar) 500 ml Water
Kuromitsu
1 tbsp Mizuame thick starch syrup 100 g Kurozato or Muscovado Sugar substitute: unrefined brown sugar 70 ml Water
Gyuhi
30 g Shiratamako (Refined Sweet Rice Flour) substitute: mochiko, regular sweet rice flour 50 g Sugar 60 ml Water Potato Starch
Toppings
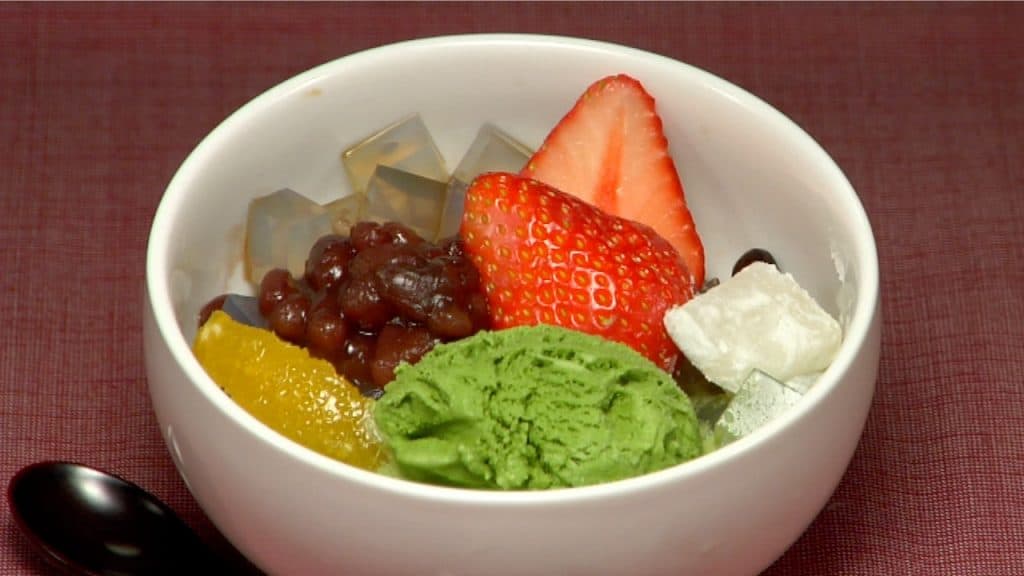
3 Strawberries 3 Navel Orange Wedges 3 tbsp Red Bean Paste anko 3 scoops Green Tea Ice Cream check out our matcha ice cream recipe 20-30 Boiled Red Endomame Peas
* 1 tablespoon (tbsp) = 15 ml, 1 teaspoon (tsp) = 5 ml
* The ingredients contain Amazon affiliate links.
Instructions
- Let's make the Kanten, also known as Japanese agar. Measure the water in the pot. Add the kanten powder to the water and turn on the burner. Lightly stir the mixture with a rubber spatula while cooking.

- When the water reaches its boiling point, reduce the heat to low. Simmer for around 2 minutes, making sure to constantly stir the kanten in the water.
- Wet a container beforehand.
- Pour the kanten into the container. When the kanten becomes cool, place it in the refrigerator.
- Let's make the kuromitsu sauce. This thick starch syrup is called "mizuame." You can substitute corn syrup for mizuame.
- Add the Kurozato, unrefined raw sugar and water to the mizuame, and heat the pot at a medium heat.
- Thoroughly mix in the ingredients until the mizuame dissolves completely.
- When it boils, reduce the heat to low and thoroughly remove the foam.
- Place the pot on a trivit. When it becomes cool, place the kuromitsu in another container and sit it in the fridge.
- Let's make the gyuhi, a type of sweet mochi. Put the shiratamako, sweet rice flour in the bowl and gradually mix in the water.
- Remove any pockets of flour and add the sugar to the flour mix.
- Put the bowl in the microwave and heat it for about 1 minute. The cooking time depends on the wattage of the microwave, and this microwave is cooking at 700 watts.
- Remove the bowl and mix the dough with a wooden spatula.
- For the second part, heat the dough with the microwave for about 40 seconds.
- Remove the bowl, wet the spatula and mix the dough thoroughly.
- The mixture should be translucent, glossy and gooey. If it is not gooey enough, heat it for an extra 20 seconds and mix well.
- Using the wet wooden spatula, place the gyuhi on the baking sheet that is generously covered with potato starch.
- Sprinkle on the potato starch. The gyuhi is extremely sticky so use a generous amount of potato starch.
- Shape the gyuhi into 5 mm (0.2") thick square and let it site to cool.
- Let's cut the kanten. Remove the kanten from the container and place it on the cutting board.
- Dice up the kanten into 1.5 cm (0.6") cubes.
- Place the gyuhi on the cutting board that is generously covered with the potato starch.
- First, trim off the four edges.
- Next, dice the gyuhi into about the same size of the kanten.
- Let's cut the navel orange. Trim off the top and bottom of the orange.
- Slice off the rind along the flesh.
- Remove the white pith of the orange.
- Make a V-shape cut into the center of the orange and remove the piece.
- Make a slice along the thin membranes to get 2 more pieces.
- Let's cut the strawberries. Trim off the stem ends. Cut the strawberries vertically in half.
- Let's serve the Fruit Cream Anmitsu. Put one third of Kanten cubes in the bowl.
- Generously pour on the Kuromitsu sauce.
- Place the sweet red bean paste and one scoop of Matcha Ice Cream on the Kanten.
- Garnish with the navel orange and strawberry. Finally place 2 pieces of Gyuhi and add some red endo beans.


Recipe Notes
Gyuhi is so soft and tasty and we recommend that you should definitely try it out.
Kanten is high in fiber and has zero calories, so feel free to use it as much as you want.
Please check the wattage of your microwave and adjust the cooking time for Gyuhi.
You should also check out our Green Tea Ice Cream recipe.