We’re making Monjayaki, a dish that originated in the old town areas of Tokyo. Since we don’t have a large griddle at home, we’ll be using the easiest method I’ve found so far. The crispy parts with a nice sear are so aromatic and delicious. Perfect to pair with a drink!
Print
Print Recipe
Tokyo-Style Savory Seafood Pancakes: How to Make Gooey & Crispy Monjayaki at Home

| Cook Time | 25 minutes |
| Time for thawing the frozen seafood mix is not included in the cook time. |
| Servings |
person
|
|
|

Ingredients
200 g Cabbage Leaves cut into 1cm/0.4" squares 200 ml Dashi Stock strong stock 2 tbsp Cake Flour or All Purpose Flour 60 g Seafood Mix frozen 40 g Thin Pork Slices finely chopped Sake Salt 2 tbsp Tenkasu crunchy bits of deep fried flour-batter 1 tbsp Dried Shrimp 1/2 tsp Aonori Seaweed Frying Oil Japanese Worcester Sauce Mayonnaise or add a little yuzukosho, soy sauce, shichimi chilli pepper, or wasabi
* 1 tablespoon (tbsp) = 15 ml, 1 teaspoon (tsp) = 5 ml
* The ingredients contain Amazon affiliate links.
Instructions
- First, thaw the seafood mix in about 3 percent salt water, which is similar to seawater. Thawing in salt water helps retain the umami flavor and prevents the seafood from absorbing excess water, keeping it from becoming soggy.

- After thawing, place the seafood mix into a mesh strainer and rinse it lightly with cold water. Tap the strainer against a paper towel several times to remove excess water.
- Place the seafood onto a paper towel and use another paper towel to thoroughly remove any excess moisture.
- If you notice any sand veins in the shrimp, remove them at this stage by making a shallow cut along the back of the shrimp and scraping them out with the tip of a knife. It's like shrimp surgery, but no medical degree required!
- Transfer the seafood mix to a tray. Add the sake to the seafood mix and toss to coat. Yes, we're cooking with sake, not drinking it... yet.
- Season the finely chopped pork with salt and a splash of sake as well. This extra step will eliminate any unwanted smells and enhance the flavors of the seafood and pork.
- Let's make the Monjayaki. Add 1 teaspoon of frying oil and heat the electric griddle to its maximum temperature, which is 240°C (464°F) on this model.
- First, stir-fry the pork.
- There’s no need to fully cook it at this point since it will be heated again later. You can also use beef or chicken instead of pork.
- When the pork is about halfway cooked, add the seafood mix.
- For the seafood, we’re using shrimp, squid, and shellfish.
- Once both are cooked, turn off the griddle, transfer the mixture to a tray, and set it aside.
- Next, let's prepare the batter. Gradually add the dashi stock to the flour in a bowl while mixing.
- You'll only need 2 tablespoons of flour. Don't worry if there are a few pockets of dry flour.
- Add plenty of cabbage leaves, cut into 1 cm (0.4") squares.
- Mix from the bottom to coat the cabbage evenly with the batter.
- Add the tenkasu, crunchy bits of deep-fried flour batter, and dried shrimp. These ingredients will add texture and more flavors to the dish.
- Heat the griddle again to its maximum temperature, and add 2 teaspoons of frying oil. Spread the oil evenly over the entire surface with a spatula.
- Now, place the cabbage, tenkasu, and dried shrimp on the griddle, keeping the batter in the bowl. Don’t worry if some cabbage remains in the batter.
- Stir-fry the cabbage thoroughly. Cooking the cabbage well will bring out its sweetness, making it even more delicious.
- Spread the cabbage across the griddle and let it cook for a while.
- Then, lightly stir and spread it out again. This will help the cabbage cook faster.
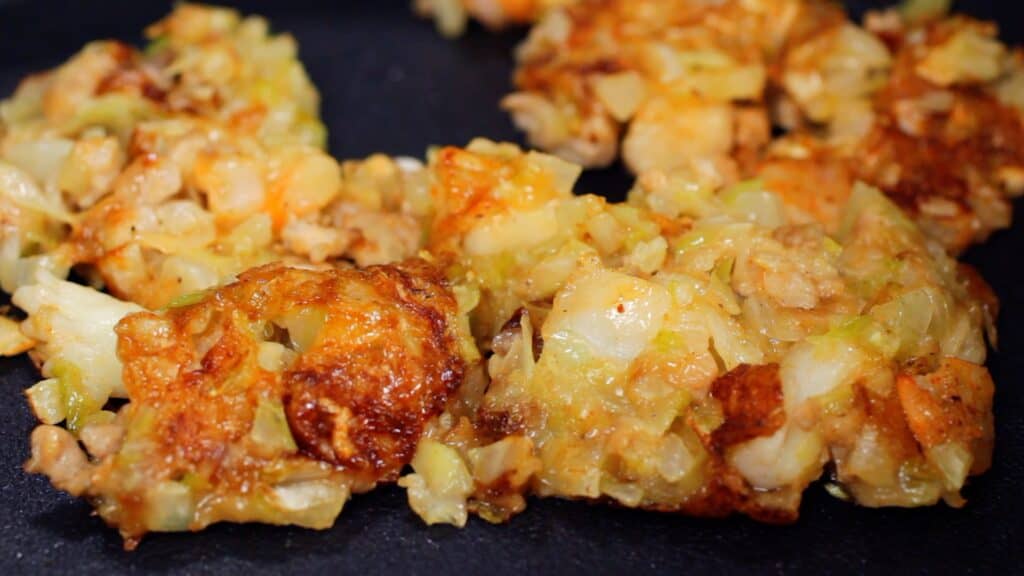
- Once the cabbage has softened and reduced in volume, it should look sweet and delicious.
- At this point, add the seafood mix that was set aside and stir-fry it together with the cabbage.
- Spread the cabbage in a donut shape, creating a ring around the edge of the griddle, leaving a space in the center for the batter.
- Pour the batter into the center of the ring.
- Once bubbles form and it starts to simmer, stir the batter.
- It will gradually thicken and develop that signature gooey texture. Mix well to cook it through.
- Then, combine the batter with the cabbage around the edges and mix thoroughly.
- Spread the mixture evenly across the griddle, making sure there are no thin or thick spots.
- Cook for 2–3 minutes.
- To check if it’s ready, lift it slightly with a spatula. If it has a beautiful golden-brown crust, it’s good to go!
- The gooey texture of the non-browned parts combined with the crispiness of the browned parts makes for a uniquely enjoyable experience that only Monjayaki can provide.
- Adding a nice browning to the Monjayaki makes it even tastier! However, since the griddle gets hot, flip it once it reaches your preferred level of browning.
- Sprinkle on some aonori seaweed for extra flavor. This Monjayaki already has a rich flavor from the strong dashi and a touch of salt, so you only need to drizzle a little sauce on top to enjoy its delicious taste.
- Chef prepared Worcestershire sauce and mayonnaise with a hint of soy sauce. My personal favorite is mayonnaise with yuzu pepper but you can also try it with shichimi chili pepper or wasabi.
- In restaurants, the batter often has a stronger flavor. Use a small spatula to press the batter against the griddle, then enjoy the Monjayaki by bringing it directly to your mouth with the spatula.
- There are no strict rules for making Monjayaki, so feel free to add ingredients you like, such as corn, cheese, or sausage, and have fun with it!


Recipe Notes
Please give it a try at your next meal or party! And remember, don’t judge it by its looks—it’s all about the flavor!