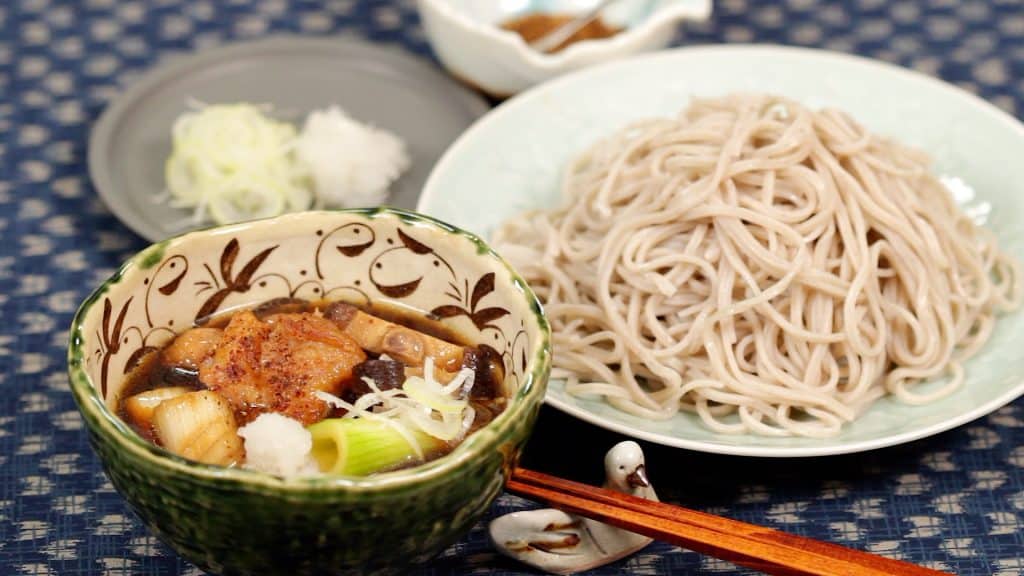
We are making Tsukesoba Kamo Nanban-style with chicken instead of duck. The original version of this recipe is known as Kamo Seiro Soba. Since kamo, duck meat isn’t easily available in Japan, chicken is often used in home cooking. The savory umami of chicken and shiitake makes the broth absolutely delicious!

|
|

Ingredients
240 g Fresh Soba Noodles
Meat
150 g Chicken Thighs 1/3 tsp Soy Sauce 1/3 tsp Sake Potato Starch
Vegetable
1 Long Green Onion (Naganegi) green part removed and cut into 10 pieces 3 Shiitake Mushrooms
Broth
1 Dashi Pack bonito and kombu 400 ml Water 60 ml Soy Sauce 60 ml Mirin 2 tbsp Sake
Other Ingredients
Grated Daikon Radish Long Green Onions (Naganegi) chopped, substitute: spring onion leaves Shichimi Chili Pepper Vegetable Oil
* 1 tablespoon (tbsp) = 15 ml, 1 teaspoon (tsp) = 5 ml
* The ingredients contain Amazon affiliate links.
Instructions
- First, soak the dashi pack in the pot of water, and turn on the burner. This dashi pack contains coarsely ground real bonito flakes and kombu seaweed, and it will allow you to make authentic dashi stock quickly.

- When it begins to boil, turn the heat to medium, and simmer for 5 minutes. We used two-thirds of the water instructed on the package to make thick and delicious dashi stock. Leave uncovered to allow any unwanted odor from remaining in the broth.
- Turn off the burner, and lightly squeeze the dashi pack and remove it. Now, the delicious dashi is ready.
- Next, let's prepare the ingredients. Cut off the stem of the shiitake mushroom. Cut the cap into 4 to 5 slices.
- Trim the root end of the Japanese long green onion also known as naganegi. Cut the white part into 4 cm (1.6") pieces. Make diagonal cuts in the long onion to tenderize it.
- Trim the excess fat from the chicken thigh beforehand and make numerous cuts in the firm stringy part.
- Slice the chicken into bite-size pieces using diagonal cuts.
- Place the chicken onto a tray. Season with the soy sauce and sake. Coat the chicken with the seasoning evenly. Let it sit for about 5 minutes.
- Now, let's make the broth for tsukesoba. Dust the chicken with potato starch. Flip the pieces over and dust the other side with starch as well.
- Add vegetable oil to a pan and turn on the burner. Swirl the pan to coat it with the oil. Place the chicken onto the pan with the skin side facing down.
- Add the long onion.
- Flip the chicken over and brown the other side.
- When both sides of the meat are browned, remove and place the chicken onto a tray. You will be simmering the ingredients later so you don't need to cook them completely.
- Brown the long onion as well, turn off the burner and save it on the tray.
- Clean the pan with a paper towel. Then, add the sake and mirin. Reheat the pan. Bring it to a boil and let the alcohol evaporate until you can't smell it.
- Now, pour in the dashi stock. Add the soy sauce.
- Add the long onion, chicken and shiitake mushroom.
- Bring it to a boil on medium heat. When it begins to boil, reduce the heat to low. Then, simmer for 5 minutes.
- If foam appears on the surface, remove it with a mesh strainer.
- Turn off the burner and the broth is ready.
- And now, let's cook the soba noodles. This small metal plate is supposed to avoid a boil over but it is optional.
- We are using these fresh soba noodles.
- Boil a generous amount of water in a pot and place the soba into the boiling water. Lightly stir with chopsticks to keep the noodles from sticking together. Cook for the time instructed on the package.
- Now, strain the soba with a mesh strainer.
- Then, submerge the noodles in a large amount of water to cool and lightly rub them to remove the gooey texture on the surface. We are demonstrating every step on this counter, but you should rinse them thoroughly with running water.
- Next, place the soba into a bowl of ice water. Chilling in ice water will give the noodles a very refreshing texture.
- Hit the strainer against a kitchen towel many times to remove the excess water thoroughly.
- Arrange the soba onto a plate.
- Now, reheat the broth. The ingredients have absorbed the broth! Looks so delicious.
- Ladle the broth into a bowl along with the chicken, long onion, and shiitake. The dipping broth isn't as strong as regular soba dipping sauce so you can enjoy plenty of it.
- Top with shichimi chili pepper. Arrange the white part of the chopped long onion and grated daikon radish.
- Dip the soba into the piping hot broth and enjoy it along with the ingredients.


Recipe Notes
You might think dipping cold noodles in hot broth is strange but this will allow you to enjoy the chewy and refreshing texture.
The fat of duck has a distinct savory taste so you should definitely use duck meat if available in your area.
I made this recipe tonight & it was delicious, highly recommend this! Thank you.
Thank you for trying our Chicken Tsukesoba recipe.🐔🍜😋 Very glad to know you enjoyed it❣️